ReptiHabitat
StyroFoam Artist
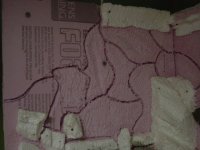
Since Everyone on here has been so helpful I am giving out my secrets to build a Fake rock Viv. HAHAHA
Materials
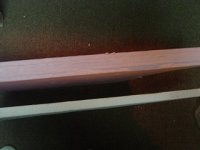
StyroFoam (expanded Polystyrene) EPS
Lots of it. It comes in any size sheets and can think of, Especially if you live near a EPS factory. Or your local home depot, value, or whatever you have by you. The hard EPS foam is better. They measure it by pounds or R-value.
Most packaging foam is 1 to 1.5 lb foam. The white sheets at value home center used for ceiling tiles is 1 lb foam. It works but not as good as the harder foams. If you live by a EPS factory like I do you can buy it in any lb strength I need. or the best stuff out there is the pink and blue R-value home insulation sheets. They come in 1/4" up to 2" thick and from 2ft by 8ft or 4ft by 8ft sheets.
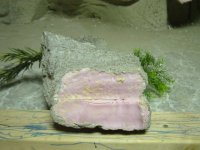
After you buy your foam sheets, collect the foam from packaging because it will make some cool little rocks from its different shapes.
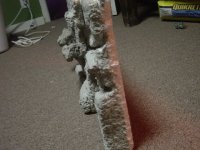
Spray foam is ok to use for large gaps and building waterfalls. But, you have to wait till it is dry then pick off the outside hard shiny shell till you get to the texture of a sponge candies inside then the cement will stick. If you try to coat the shiny smooth shell of the spray foam it will just slide off.
They sell foam glue to glue the rocks on to the sheets but its expensive and smells like crap. I use the cheapest latex caulk I can find.
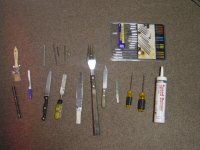
Nails, screws, metal rods - whatever you have laying around. Used to attach carved rocks to sheets after caulk is applied. Big screws and metal rods are good for going through the back of the foam and into the shelves and cliffs to help support them. My fav is dry wall screws BC they have deep threads and hold well.
Tolls used for carving. - Anything you have laying around. Old knives with serrated blades, razor blades, old saw blades, forks, steak knives, flat head screw drivers anything to make the texture.
heat gun or high powered blow dryer. Heat gun @ harbor freight works good and its so cheap.
GE Silicone 1 not 2. It has to be free from the anti mold and fungus chemical. Bad for reptiles. I used the GE Silicone 1 for glueing the background into the tanks or cages and sealing any area around the Background so that those little meal worms and super worms that tend to escape the dish from my lizards dont burrow behind it and molt into those giant black beetles. If they get behind the foam they will burrow a hole till they turn into beetles.
cheap Paint brushes the little 1/2" or 1" cheap wood handle brushes work the best.
Cement - Only 2 types I found thay work good. The quickcrete vinyl patch and the fiberglass reienforced cement work the best. Dont use the cheap stuff with the pebbles or sand or you will be cursing all day.
broom and vacuum - trust me as you carve and scrap the foam there will be pieces every where as you walk through the house they will go with you. Then when you try to vacuum them up the exhaust on the vacuum with blow it away from the front and you will be chasing them around for months. If you have a gf or wife, do it outside or you will prob go deaf from her screaming.
Lots of time and plenty of coffee or beer. But not to many beers or else you might be in the ER getting stitches.
I think thats all of the tools and materials. I will post a kinda step by step with some photos. But, I need to cook diner for my son and I first.
Materials
StyroFoam (expanded Polystyrene) EPS
Lots of it. It comes in any size sheets and can think of, Especially if you live near a EPS factory. Or your local home depot, value, or whatever you have by you. The hard EPS foam is better. They measure it by pounds or R-value.
Most packaging foam is 1 to 1.5 lb foam. The white sheets at value home center used for ceiling tiles is 1 lb foam. It works but not as good as the harder foams. If you live by a EPS factory like I do you can buy it in any lb strength I need. or the best stuff out there is the pink and blue R-value home insulation sheets. They come in 1/4" up to 2" thick and from 2ft by 8ft or 4ft by 8ft sheets.
After you buy your foam sheets, collect the foam from packaging because it will make some cool little rocks from its different shapes.
Spray foam is ok to use for large gaps and building waterfalls. But, you have to wait till it is dry then pick off the outside hard shiny shell till you get to the texture of a sponge candies inside then the cement will stick. If you try to coat the shiny smooth shell of the spray foam it will just slide off.
They sell foam glue to glue the rocks on to the sheets but its expensive and smells like crap. I use the cheapest latex caulk I can find.
Nails, screws, metal rods - whatever you have laying around. Used to attach carved rocks to sheets after caulk is applied. Big screws and metal rods are good for going through the back of the foam and into the shelves and cliffs to help support them. My fav is dry wall screws BC they have deep threads and hold well.
Tolls used for carving. - Anything you have laying around. Old knives with serrated blades, razor blades, old saw blades, forks, steak knives, flat head screw drivers anything to make the texture.
heat gun or high powered blow dryer. Heat gun @ harbor freight works good and its so cheap.
GE Silicone 1 not 2. It has to be free from the anti mold and fungus chemical. Bad for reptiles. I used the GE Silicone 1 for glueing the background into the tanks or cages and sealing any area around the Background so that those little meal worms and super worms that tend to escape the dish from my lizards dont burrow behind it and molt into those giant black beetles. If they get behind the foam they will burrow a hole till they turn into beetles.
cheap Paint brushes the little 1/2" or 1" cheap wood handle brushes work the best.
Cement - Only 2 types I found thay work good. The quickcrete vinyl patch and the fiberglass reienforced cement work the best. Dont use the cheap stuff with the pebbles or sand or you will be cursing all day.
broom and vacuum - trust me as you carve and scrap the foam there will be pieces every where as you walk through the house they will go with you. Then when you try to vacuum them up the exhaust on the vacuum with blow it away from the front and you will be chasing them around for months. If you have a gf or wife, do it outside or you will prob go deaf from her screaming.
Lots of time and plenty of coffee or beer. But not to many beers or else you might be in the ER getting stitches.
I think thats all of the tools and materials. I will post a kinda step by step with some photos. But, I need to cook diner for my son and I first.