-
Hello!
Either you have not registered on this site yet, or you are registered but have not logged in. In either case, you will not be able to use the full functionality of this site until you have registered, and then logged in after your registration has been approved.
Registration is FREE, so please register so you can participate instead of remaining a lurker....
Please be certain that the location field is correctly filled out when you register. All registrations that appear to be bogus will be rejected. Which means that if your location field does NOT match the actual location of your registration IP address, then your registration will be rejected.
Sorry about the strictness of this requirement, but it is necessary to block spammers and scammers at the door as much as possible.
You are using an out of date browser. It may not display this or other websites correctly.
You should upgrade or use an alternative browser.
You should upgrade or use an alternative browser.
Sammich box setup for hatchlings
- Thread starter Serpwidgets
- Start date
ghosthousecorns
Well-known member
I was wondering about temps in those things too.
I built a shoebox rack but I filled it already lol. More hatchlings on the way. I've been eyeing the rubbermaid take-alongs that are on sale but I wondered how you can possibly get a temperature gradient in something that small.
I have heat tape left but I think the flimsier containers might not be suitable to use with it. So what is the secret?
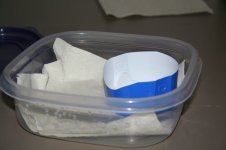
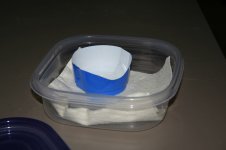
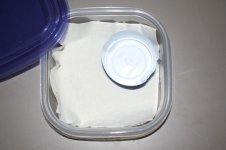
I use clear plastic food boxes for my hatchlings too. A little larger than Serpwidgets' but same principle...


I have them in a shelving rack with heat mats (or tape) on the wall behind the rack, controlled by a thermostat. The back of the boxes are close to the heat so it creates a gradient, without risking the plastic of the boxes melting by being in direct contact with the heat.

I have new hatchlings in there at the moment, that's why it looks so humid.
I have them in a shelving rack with heat mats (or tape) on the wall behind the rack, controlled by a thermostat. The back of the boxes are close to the heat so it creates a gradient, without risking the plastic of the boxes melting by being in direct contact with the heat.
I have new hatchlings in there at the moment, that's why it looks so humid.
El Jefe
Mark 16:18
Corn condo baby....
Hey,
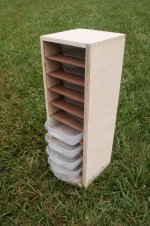
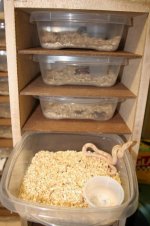
Since we are posting pictures of the baby homes I thought I'd post mine. These racks are made to use the rubbermaid take-a-long sandwich size. They fit 10 each. I don't use heat has I heat my building but people I've sold them to people who put heat tape down the back with little problem. I've used sani chips (Aspen) in the past but currently use napkins as they fit perfectly and are a little easier to clean. Plus, you don't have the potential ingested wood chip problem. There is an 1/16 inch gap between the top and the shelf and that seems to be plenty of air and therefore I do not put holes in them. I do put holes in the tops, however, and when I go to shows I just put the top on and pack the whole rubbermaid (I take out the water of course) and I'm ready to go. I use regular sized address labels for my feeding records and they fit perfectly on the outside so I can see who it is and how they are doing.
I believe there is a guy who sells these (cough, cough...look at personal forums :sidestep: ) but since this is not the place to post for sale stuff I will refrain from doing so.
Picture of a unit, one with my butter striped motley and sani chips and then my anery patternless with napkins.
Hey,
Since we are posting pictures of the baby homes I thought I'd post mine. These racks are made to use the rubbermaid take-a-long sandwich size. They fit 10 each. I don't use heat has I heat my building but people I've sold them to people who put heat tape down the back with little problem. I've used sani chips (Aspen) in the past but currently use napkins as they fit perfectly and are a little easier to clean. Plus, you don't have the potential ingested wood chip problem. There is an 1/16 inch gap between the top and the shelf and that seems to be plenty of air and therefore I do not put holes in them. I do put holes in the tops, however, and when I go to shows I just put the top on and pack the whole rubbermaid (I take out the water of course) and I'm ready to go. I use regular sized address labels for my feeding records and they fit perfectly on the outside so I can see who it is and how they are doing.
I believe there is a guy who sells these (cough, cough...look at personal forums :sidestep: ) but since this is not the place to post for sale stuff I will refrain from doing so.
Picture of a unit, one with my butter striped motley and sani chips and then my anery patternless with napkins.
Attachments
Serpwidgets
New member
Thanks for the pics Jeff, some day it would be nice to have that type of setup.
For heat, we just have the room at 82. IMO it would be more ideal to give them a gradient, but they do very well in their current setup.
There are a few nice features about this setup:
1- The boxes cost 50 cents each.
2- They are way larger than deli cups (3" deli cup = 7 sq inches, 4" sammich box = 16 sq inches) but do not really take up that much extra space because they are square instead of round.
3- They are the same size as napkins, so it is easy and inexpensive to clean, and some of the hatchlings seem to love making their own hide between the layers. The napkins come in 4 colors, so I alternate colors each time to make sure nobody got skipped.
4- It's easy to make air holes with a soldering iron.
5- The "water bowl" is a SOLO cup, cut to the right height, so that the cup cannot tip over. (If you cut at the horizontal line in the |_ in SOLO, it will be perfect height.) The little dip lets them in/out. The only messes come from the occasional hatchling (about 1 or 2 out of 60 or so hatchlings) that manages to get a corner of the napkin into the water.
Also, for record keeping, I use a sticker on the front of the box. Starting at the upper left I make a dot for each feeding... green if they ate f/t, a green L if they ate live, a red dot if they refused. I also started switching every third feeding from green/red to blue/orange. If you want to get fancy you can also use other colors for other things, and put another symbol to show when they've shed. (Hurley uses her own system for her hatchlings, and she actually tracks it all in a spreadsheet.)
ghosthousecorns
Well-known member
Thanks. Good info.
I have been keeping the hatchlings in 10 gal tanks until they eat their first meal and then I get them separated into my shoebox enclosures, put a sticker with their gender and an id number and I keep the feeding records in my snake notebook with the number and the date they ate.
I know I could improve a lot on my system, I don't like to cohab at all even though I haven't had any cannibalisms yet and I feel the ones that are freshly hatched are less likely to do so until their first shed when the food drive begins to kick in. Anyways that's why I'm asking questions here. I just don't think I have one room in my house where it's possible to keep temps at a steady 82.
I bought a nice big wooden toybox at thrift store, I can fit 12 shoeboxes in there and probably even more if I went with sandwich size, but I need to rig it for heat. If I went with shelves and belly heat it would be one continous piece of tape but with the back heat you have to use several strips. About running the strips of heat tape up the back of a rack... Since it's a few separated strips of tape what is the best way to wire them? Does each strip have to have its own pigtail or do you use a common wire for all?
Great idea to use solo cups. I went to irrigation parts store to price pvc caps and they were not cheap!
Serpwidgets
New member
One other note on the SOLO cups. There are two sizes now. The wider ones are a little better IMO since the snake is less likely to overflow it if it soaks in the water, which many of mine have done this year.
El Jefe
Mark 16:18
Yeah, this saves a lot of time...especially when you have several of these units set up. I thought I'd do a comparisson for those who care with the Rubbermaids.Serpwidgets said:Thanks for the pics Jeff, some day it would be nice to have that type of setup.
I agree here. 82 is what my room is. My adults have it a little hotter as do my pythons and boas but the babies all get 82.Serpwidgets said:For heat, we just have the room at 82. IMO it would be more ideal to give them a gradient, but they do very well in their current setup.
Yep, Rubbermaid ones are tooSerpwidgets said:There are a few nice features about this setup:
1- The boxes cost 50 cents each.
Rubbermaids are more like 6 X 6Serpwidgets said:2- They are way larger than deli cups (3" deli cup = 7 sq inches, 4" sammich box = 16 sq inches) but do not really take up that much extra space because they are square instead of round.
Yeah, napkins are ideal and fit well. Colors...never thought about that one! Good idea.Serpwidgets said:3- They are the same size as napkins, so it is easy and inexpensive to clean, and some of the hatchlings seem to love making their own hide between the layers. The napkins come in 4 colors, so I alternate colors each time to make sure nobody got skipped.
I'm sure rubbermaids can do this too....advantage of the rack is the air space is at the top. Plus, faster working with no lids involved.Serpwidgets said:4- It's easy to make air holes with a soldering iron.
I did that too but it became more time that it was worth. As the rubbermaids are not that high, I can use a 2oz portion cup and get by just fine with no tipping and I don't have to mess with the notching or cutting cups.Serpwidgets said:5- The "water bowl" is a SOLO cup, cut to the right height, so that the cup cannot tip over. (If you cut at the horizontal line in the |_ in SOLO, it will be perfect height.) The little dip lets them in/out. The only messes come from the occasional hatchling (about 1 or 2 out of 60 or so hatchlings) that manages to get a corner of the napkin into the water.
I, too, have a sticker on the front. Actually, it is address label size and I use the letters of the alphabet. I start with A and go on down the line. If the snake eats, letter A, if it doesn't, I put letter A and circle it. If it eats a Live pink it is A with a little L and I circle the letter if it doesn't eat. Next meal is letter B and so on. This way I can see the consecutive order of feedings so when I look back it is easy to see who is behaving and who isn't. I feed all hatchlings on the same day so I know which days people are eating etc. Shedding = the letters sh. It works for me and it is just a variation of Chuck's system....I guess whatever works is the best way to go.Serpwidgets said:Also, for record keeping, I use a sticker on the front of the box. Starting at the upper left I make a dot for each feeding... green if they ate f/t, a green L if they ate live, a red dot if they refused. I also started switching every third feeding from green/red to blue/orange. If you want to get fancy you can also use other colors for other things, and put another symbol to show when they've shed. (Hurley uses her own system for her hatchlings, and she actually tracks it all in a spreadsheet.)
jazzgeek
The Rule Of Thirds.
Danny, you've read waaaay to many "Far Side" comics.dwyn127 said:I like it. Corn Condo's with all the luxury's of home! A picture of mom and dad on the wall would be a nice touch.
regards,
jazz
hana
I put the 'pygmy' in ban.
jazzgeek said:you've read waaaay to many "Far Side" comics.
Such a thing is not possible.
hana
scottsquatch
New member
corn condos all the way!
I gotta go with the corn condos. I saw Jeffs and liked them so much I built one. It turned out great and I am gonna build a second one before my clutches hatch out. The 6x6 rubbermaid "sammich" boxes work great and were very cheap. The little bit of clearence is enough for circulation, so no air holes are required. Basically they are tiny versions of big racks. Talk about convenience! Since my snake room has fluctuating temps, I just attached a piece of 4 inch heat tape to the back wall of the rack. I will never mess with delis again except for if/when I ever ship hatchlings. Thanks again for the inspiration Jeff.
Scott
Kitty
You rang?
So, I gotta' ask - when you're building the condos, what do you use for spacers between the shelf and the box?
I ask because the spacers we used for our bigger racks allowed some escapes (all recovered). I'm using lids on the containers now and ripping out shelves to accommodate that. But I can see where working with babies would be tons easier with the slide-in/slide-out shelves.
I ask because the spacers we used for our bigger racks allowed some escapes (all recovered). I'm using lids on the containers now and ripping out shelves to accommodate that. But I can see where working with babies would be tons easier with the slide-in/slide-out shelves.
I have feed sheets that list each hatchling and a box for "ate" "in shed" and "shed". These sheets I use on feeding day to check off who ate and who is in shed or did shed. That way I can input them into my spreadsheet in like 2 minutes for the whole crew. The spreadsheet is color coded for events, so it's very easy to scan and see trends and what they've been doing.
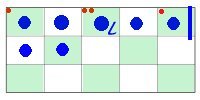
On the boxes, though, I have stickers for the first 15 feedings (because after that they've either been culled before 15 or they are good feeders). A copy of an example sticker is below. I use these little rectangular stickers that are about 1/2 the size of an address label.
For hatchlings in a feeding trial, each trial has its own color. This sticker happens to have been from the "fat supplement" trial, so the green squares mark which feedings should have fat supplementation. Very handy for when I'm sorting them into feeding groups. I make a sharpie dot in blue for each time they did feed. If they don't feed for that square, I put a little red dot in the upper left corner. If they refuse again, 2 dots. If they make it to 3 dots, they are out of here. If they eat, then they get their blue dot in that box. That way I can easily see how often they skip and how many times. When they shed, they get a line between the 2 feedings they shed between. If live is offered and eaten, a small L is placed next to the blue dot.
That's just my system. Everyone has their own likes and emphases.
Attachments
ghosthousecorns
Well-known member
My notebook would probably look like gibberish to anyone else.
My list will have the gender symbol and hatchling number first, then the dates of attempted feedings, f/t (frozen thawed), t/f (tease-fed), L (live), O (ate after being left overnight with pinky), R (refused), And Sh (shed)
But it makes sense to me so I guess that's what matters.
I adapted a TV cart to a second hatchling rack yesterday and used up my remaining heat tape. I'm still working on my toy box rack but I want to use the heat rope cable since it seems an easier way to provide the back heat with less wiring. I am waiting for the local pet store to get it in (traded two hatchlings for store credit) I like the condos though, if I had the $ I'd be buying me some of those.
Kitty
You rang?
Hurley said:...
That's just my system. Everyone has their own likes and emphases.
I couldn't get the darned image, but ... If I understand your system, the top row of the sticker, middle box, indicates this baby refused twice before accepting a live pink?
/me exploring systems...
El Jefe
Mark 16:18
Kitty said:So, I gotta' ask - when you're building the condos, what do you use for spacers between the shelf and the box?
Spacers? I build these to allow only a sixteenth of space between the shelf and the box. No other spacers needed. I premade a jig that took me forever to tweak...but now that I have this jig the condos are fairly simple to create with the perfect amount of space. I am toying with a no space model but the humidity seems to be too much and I don't like having to put holes in the rubbermaids.
scottsquatch
New member
no spacers needed
I didn't/don't make them in quantity like Jeff, so I don't need a jig. I was just very accurate with a tape measure and pencil. I marked where I needed to put the blade in order to create the slots for the shelves to slide in and presto. Then I lined up the slotted side with the unslotted side and matched up where I needed to cut more slots. When I was done I had a perfect rack without space for escapees. Hope that helped Nancey.
Scott