• Hello!

    Either you have not registered on this site yet, or you are registered but have not logged in. In either case, you will not be able to use the full functionality of this site until you have registered, and then logged in after your registration has been approved.

    Registration is FREE, so please register so you can participate instead of remaining a lurker....

    Please be certain that the location field is correctly filled out when you register. All registrations that appear to be bogus will be rejected. Which means that if your location field does NOT match the actual location of your registration IP address, then your registration will be rejected.

    Sorry about the strictness of this requirement, but it is necessary to block spammers and scammers at the door as much as possible.

Bioactive substrate (BAS) Natural viv - a why and “how-to” guide.

supplies pictures

Hopefully these pics will help you while your search for supplies.

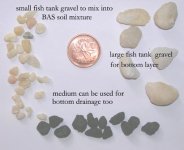
Gravel (pet/aquarium supply shops-wash it well),
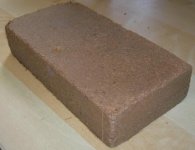
Peat bricks (pet shop),
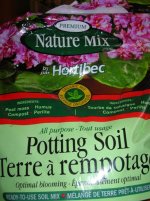
ready to use peat and potting soil (garden centre),
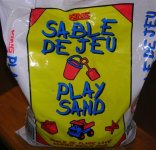
play sand, PVC pipe (home depot),
plants: garden centre, home depot, etc.
 

Attachments

  • gravel sizes.jpg
    gravel sizes.jpg
    38.7 KB · Views: 356
  • peat brick.jpg
    peat brick.jpg
    33 KB · Views: 356
  • play sand.jpg
    play sand.jpg
    57.8 KB · Views: 357
  • potting soil.jpg
    potting soil.jpg
    82.8 KB · Views: 355
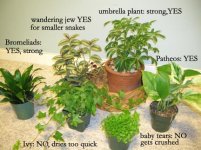
  • yes no plants.jpg
    yes no plants.jpg
    62.4 KB · Views: 358
Now from what I gathered, Tracy you use a UTH in conjunction with a UV light. Now is the UV light a stripe light or it an actual bulb... The only reason why I am asking is I didn't realize UV produced heat, if any. If your using a bulb, is it a mercury vapor bulb or just a halogen light bulb?
 
Putting it all together: 1. The gravel and soil layers

1. Cleaning
Clean with soapy water and then rinse really well your tall tank and the rubbermaid tub you'll mix the BAS soil in.

2. Expand your peat mixture
expand your 2 peat bricks with warm water as per the package directions. Don't over-soak it but rather, add water as needed. This will take about 3 hours of coming back to check, add more water, and stir it.

When done, divide in half, (1/2 for middle PEAT Layer, 1/2 to add to soil). If you buy ready to use peat, get a 20 litre bag and moisten it so that it clumps but then crumbles. Set aside.

3. Mix your BAS substrate soil mixture.
This will give you a lot but you'll need left overs for replenishing.

In a large, deep rubbermaid container mix well:
- potting soil - 20 liters
- coco peat/eco earth brand is fine - 1 brick or 10 litres.
- PLAY sand - 2 liters.
- volcanic rock (for drainage)- 2 handfuls. (Perlite, calcined clay or natural kitty litter clay with no additives). Not needed if your soil has it already.
- small fish tank gravel - 2 handfuls

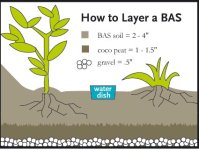
4. Place BOTTOM gravel layer:
-Cover the bottom of the tank with medium or large gravel, (enough to cover the bottom of the tank in about a 1” layer)
- smooth this layer out so it is level

5. Place MIDDLE peat layer:
- add 2" of straight moistened peat on top of the gravel.
- smooth this layer out so it is level

6. Place TOP BAS soil layer:
- Put 3-4" of BAS soil mixture on top of the peat layer. You'll need to account for the settling which will take place over the next week and the packing of soil in hills and/or around plants so be generous and add more like 4-5".

- While landscaping you can remove some soil if there is too much as you go along.

COMING NEXT:
Putting it all together Part 2: Experimental dry run of Landscaping and decor fixtures.
 

Attachments

  • how layer BAS copy.jpg
    how layer BAS copy.jpg
    48.6 KB · Views: 355
Green Bean said:
Now from what I gathered, Tracy you use a UTH in conjunction with a UV light. Now is the UV light a stripe light or it an actual bulb... The only reason why I am asking is I didn't realize UV produced heat, if any. If your using a bulb, is it a mercury vapor bulb or just a halogen light bulb?

Hi Green Bean. The light is a tube/strip light. I got it from Home Depot, not a pet shop. I was surprised too that it let off heat. The light says it's for the right spectrum for "indoor plants and fresh water fish". It DOES, indeed, say it contains mercury. However, the mercury vapour bulb I use with my bearded dragons, the UVB light, gives of little heat, if any.

This is curious to me as well. I shall investigate this one further.

Also, when I do the lighting section, I will take a picture of the tube and the packaging it came in and post it here.
Thanks!
 
kathylove said:
It's great to see somebody trying something relatively new and exciting, and coming back to report on the results. Philippe has always been "before his time", so it is nice to see that some of us are beginning to catch up to him...
I am still mired in the plastic box syndrome, but yearn for the time (hopefully a couple of years from now) when I will start setting up a lot of corns outdoors in similar setups to my Amazon tree boas.

Thanks Kathy : ) In defense of other breeders and those with large collections or limited space, I would do the rack thing too if i had as many snakes as you guys. When Blake sends me those hatchlings from you, they will be housed in plastic boxes for the first 6-9 months.

I have a small collection but can see how the addiction will take over my house soon enough! Gonna have to get really creative and wise with my space!
 
Putting it all together 2 : Planning and dry runs of viv component placement

Before even planning or trying a dry run of where you are going to place your components, there's many points to consider first. The book does a great job of expanding on these points.

- VARIETY/CHOICES OF SIZES of MATERIALS: collect more rocks, branches, dishes than you need because your "plan" and the real finished product will not even be close. If the rock you first choose is not suitable for whatever reason, others are there for you to choose from. It's kinda like putting a puzzle together and when some pieces don't fit you'll need others to choose from.

Plants: You're going to have to get strong, sturdy, disease and bug free, non toxic plants that do well in low light and a semi-moist environment. Ensure plants are free from bugs. But them first and observe. Toss sick ones. As snake gets heavier, he'll either crush plants or realize they won't support him. You'll need to make adjustments every 6 months or so and prune over-growth.

While planning consider:
- size of your tank, allowing room for snake to grow
- open yet sheltered areas for snake to rest.
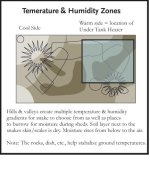
- temperature zones
- viewing: don't obstruct your own view. Put tall stuff and hills at the back.
- ease of removing hide or snake
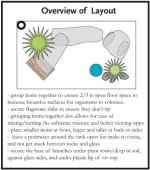
- leaving 2/3 open floor space for colonization.
- ease of watering and stirring BAS soil mixture
- various kinds of surfaces for a variety of organisms to colonize
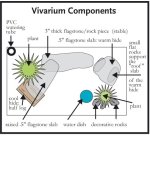
- watering: ease and spots for, anchoring and hiding the PVC tube.
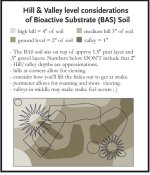
- valleys for cool temps/security and hills for variety and a place to plant the plants in
- creating moist and dry zones for snake
- places for snake to hide, cruise, feed, drink, climb, shed/rub against, get moisture from
- securing all components to make sure they don't crush snake if toppled
- ease of adjusting your viv to the snakes needs
- placement of temp probes, gauges, etc., and how/where to hide them (behind attractive natural items).
- having the ability to view 3 sides of the viv and BAS soil through glass
- ways to increase surface area for snake to live on via raised slabs "shelves", big leaves, branches, etc.
- feeding
- attractive backgrounds. (I haven't figured mine out yet.)

These diagrams (below) of my setup may help inform your planning and final product. I did a few drawings and then when I was out and about I picked up supplies, rocks, branches over a month or so. This stage was really fun as the discovery of things to put in the viv was like winning the lottery!

I played around with my rocks, hides, branches etc., on the floor of my living room to see how well they stacked and worked together. Then, after sterilizing everything, I did a dry run inside the viv (on top of the soil) to figure out actual placement of all components, added and removed hills in the soil, switched location of plants, etc.

I ended up discarding many ideas and my drawings were not indicative of the actual finished product so don't get discouraged. You'll figure it our as you go.

Coming next: Landscaping do's and don'ts and design rules for achieving a viv with visual impact.
 

Attachments

  • overview of layout.jpg
    overview of layout.jpg
    63.4 KB · Views: 353
  • viv labeled items.jpg
    viv labeled items.jpg
    52.9 KB · Views: 350
  • hill valleys.jpg
    hill valleys.jpg
    65.2 KB · Views: 350
  • temp zones.jpg
    temp zones.jpg
    55.9 KB · Views: 352
I liked Phillipe's book, myself, and used his principals to design my treefrog viv. I honestly don't have enough space to use a 55 for my corn, and to get any plants in there that would have a chance of holding an eventual adult corn, I'd need the larger tank.

But here is a pic of my treefrog viv. The ideas in Phillipe's book can easily be applied to other species.
 
Last edited:
Hypancistrus said:
I liked Phillipe's book, myself, and used his principals to design my treefrog viv...
...But here is a pic of my treefrog viv. The ideas in Phillipe's book can easily be applied to other species.

Sweet! Looks like a happy place to be.

How long have you had this frog viv going?
I'm assuming it is a high humidity environment. If so, what %?

Can you please comment on exactly what light you are using, watts, kind, brand, etc., which plants you find are doing well under those lights and which ones are wilting under these lighting conditions?

I for one would find it most helpfula dn I think the folks here would too.

Thanks for posting.

Close-ups?

T : )
 
Great idea to make this a sticky. This is a great way to keep herps IMO, so I think it would be nice to have this available to referance.

I was just reading the latest Reptiles Magazine and they have a 'Living Vivrium' article every once and a while now which is similar to the tank you've suggested here. The viv they were discussing in this article was a very impressive 6' x 3' x4' tank with the equivalent of a 30 gallon fish tank at one end. The tank was a rain forest viv and had a number of frogs, fish, geckos and other lizards, as well as shrimp and a rough green snake. It was a very impressive set up.

Of course I show it to my dad (who is an ecologist) and he imediately mentions that in is not set up as a certain locality. That is the animals and plants were not selected from only the Brazilian rain forest, but came from all around the world. He wants to create a viv modeled after, say, the Amazon river bank and include the animals and plants that livein that area. There's a great book on that idea of a mini ecosystem in a viv that he's leant me, but I can't remember the name of the book.

Great threa!!
 
Sorry I've been away from my promise to continue this info thread for a week or so. Work and such...

I'm going to work on it this weekend.

Thanks! Stay tuned...
 
Landscaping do's and don'ts

Landscaping dos and Don'ts

Do's
- Do mix a bit water to the earth when you are dry run landscaping to give it some structure.
- Do choose healthy strong plants.
- Do choose rocks with flat surfaces as they are more stable and won't fall over.
- Do get a light specifically for Plants.
- Do pack the earth firmly around plant bases. Gives the roots something to dig into.
- Do consider making the weekly stirring and watering of the substrate easy on yourself. Simple set-ups make it easy to move stuff around. I didn't secure any of the hides into the side of a hill for example, so I could lift them easily and such.
- Do expect to have to make adjustments after you have a snake actually living in there. The snake will let you know what he needs. Jo let me know I needed to change her warm hide to a half log as she never used it until I changed it.
- Do make a deep hill at the back somewhere. If you place it around the watering tube, it acts as support for the tube. My snake LOVES burrowing and making little underground tunnels. These tunnels eliminate the need for a moist hide during sheds. Plus, it's too cute watching them poke thier little heads out and retreating backwards! Plus, I can see parts of the tunnels through the glass sides so I get to see her underground a bit too!

Don'ts
- don't make the earth so thick that the heating pad can't do its job.
- don't forget to secure all stones and heavy stuff so snake doesn't get squished.
- don't pack the earth down. The organisms need oxygen.
- don't block your view with big plants at the front. Don't cover more than 1/3 of the earth
- don't make the earth too flat. Provide hills and valleys for fun/variety and temperature gradients.
- don't forget to sterilize all tools before use and landscaping components before adding them in.
- don't forget to place a piece of crumpled steel screen inside the watering tube and also remember to place the watering tube in first.
- Don't use moss. It rots, smells and needs to be replaced too often. Also, it is a barrier for water and oxygen getting to the organisms underneath. The Exo-Terra stuff is flaky and while it looks cool, it might give problems. The book recommends not using it in moist areas but if you do, move it aside when doing your weekly watering and stirring.

I'll add more if I think of them. You'll learn as you go too.

Next: Design Tips.
 
Design Tips

I'm just gonna keep this simple... Whether designing a room, a marketing flyer or a vivarium, these few rules will offer variety, dynamic compositions, and visual harmony. A whole chapter could be written on each topic but perhaps a simple overview might help you to produce a indoor garden you enjoy when your snake is hiding.

CONTRAST: When designing anything, contrast makes things more dynamic:
- dark with light, big with small, tall with short, hard with soft, thick with thin, patterned with solids, you name it. Whatever elements you are using, look for opposites to compliment and highlight. Example: A plant with few dark broad pointed leaves paired with a plant with multiple small round lighter leaves.

RULE OF 3: 3 is a magic number. 3 plants, 3 varieties, 3 levels of height. 3 just makes things work. Example: 3 rocks of 3 different sizes and shades or 3 different elements put together like stone, wood and foliage.

Grouping things together and creating empty space on purpose. Don't try to fill up all the empty spots. Group items together and create empty spaces. It will look less cluttered and be easier to maintain and stir the substrate. Empty space gives the eye a place to rest.

Colour harmony
http://www.colormatters.com/colortheory.html

This website and others can explain it to whatever level you feel like going. Basically, start with the colour of the snake and work from there. Ask yourself if the snake would "match" this colour rock, wood, etc. Will these plant colours clash with one another, do they compete for attention or will the snake really stand out against this colour, etc. Stick to 3 colours (and shade of those 3 colours) plus the colour of the earth and you'll be fine.

Variety: Personally, I feel restraint is a good thing in the vivarium. The book recommends it for practical reasons and as an artist, I do so for aesthetic. Keep it simple, uncrowded, yet offer multiple kinds of surfaces, scents, levels, tactile experiences, sizes of spaces to explore, etc.

I could go on but most would be bored by now unless it was your "thing". Just remember these few simple rules and you'll come up with a winner.

Please post pictures and we can even offer eachother some advice in terms of placement, plant choices, etc.

I am getting a Blizzard Corn and am actually considering a themed vivarium, something really unexpected visually which also meets the needs of the snake. A sculpture kind of thing. ANY IDEAS???


Next: Maintaining...
 
Tracy, you've done a fantastic job with this!! I hope they do sticky this somewhere so that we can always have it for reference. I've put it in my favorites so that if it doesn't get stuck...it will always be handy!
 
Vivaria Maintenance

Interesting thing about The book that inspired me to keep my corn in Bioactive Substrate (BAS/BSS), "The Art of Keeping Snakes, by Philippe de Vosjoli" is that the shortest chapter in the book is the one on maintenance. Technically, it's 3 pages long but one entire page of that chapter is devoted to shedding.

Maintenance of a BAS/BSS is so simple!

- When you see poop, scoop it out and turn the earth where the poop was to mix the soiled earth into the deeper substrate layers, the moist bacterial zone of the BAS so the bugs can get to work on the residue.

- Mist a few times a week to drive water soluble wastes to the deeper substrate layers. Monitor your humidity levels and use your judgement.

- Every 7-10 days or so, water and turn the open substrate areas. Allow the top 1/3 of the substrate mixture to dry out before watering. If it's taking 2 weeks or more for this drying out of the top 1/3 to happen, you have watered too much. This prevents the surface minerals and matter from caking and drives it to the deeper BAS layer where it can be broken down, use by plants, etc.

- ABOUT WATERING: So far I have noticed that watering in only one corner does not work well to moisten the whole tank. Spot watering plants at the bases and also throughout the tank with a turkey baster works really well. DON"T SOAK THE EARTH, just water it to moisten it enough to keep it moist for a week or so. This will be gauged through trial and error and will depend largely on the humidity and temperature of your home. Monitor with digital equipment for best results.

- Change water at least twice a week.

- Clean tank glass and light fixtures as needed inside with water and papertowel or a squeegee, outside with a diluted glass cleaner.

- Other "As needed" tasks: clean landscape structures as they become dirty, prune or replace plants when overgrown or tattered looking, remove dead skin, rearrange structures if toppled, etc.

- Replace plant lights when needed. Plants get tall and skinny when they are low on light. Lizard UVB lights get replaced every 6 months but maybe once a year would be okay for the plants? I don't know yet as I have not gotten that far.

That's about it. I'll add some of my observations as the months go by.

Again, I want to stress that I AM NOT THE EXPERT. Phillippe de Vosjoli wrote the book and many of the things I typed here come straight from the book. Buy the book, research as much as you can and learn what works best for you and your snake through trail and error.

So far, my corn Josephine appears to be having a lot of fun with making tunnels, using all the various spots I have created for hiding and basking and knows where to go to get away from me when she sees me coming! Her sheds are better, her skin is shinier and, as the top layer of the BAS is dry, she has no skin nor respiratory problems.

Good Luck and please add your observations to this thread!
 
The Knight said:
Thank Tracy. Extremely helpful!!!


My pleasure!

Josephine is doing excellent on this method. Happy, healthy and quite active. Loves climbing about when she thinks noone is looking! She exhibits a wide range of behaviours and is not as afraid of me, although this could be due to familiarity.

Go for it! You'll be glad ya did!
 
Great read, I keep my dart frogs in natural vivs. A couple of things about snakes in them...

I tried keeping my king in one... he always seemed "dirty" his white bands weren't white, which I didn't like.

When trying to pick up a snake from a viv with plants and sticks (a larger snake) they tend to wrap their lower halves into the plants and what-not, knocking stuff over and pulling up the plants.

Just a couple of points to ponder. :grin01:
 
Back
Top